On the Option: New > Sale, you add products to the Sale or ticket/receip.
MULTIPLE UNITS:
If you click several times on a product, more units of that product are added to the ticket. For example, in chicken-flavored dog food, if I click 3 times, 3 units are added.
You can also add products using a scanner or barcode reader.
How to use the barcode scanner for a product?:
And by clicking on the product added to the ticket, more information will appear. If you click on Units, a pop-up or overlay screen will open where you can modify them.
REMOVE FROM TICKET
In the ticket, clicking on a product allows you to remove it. Just click on the delete icon to remove it from the ticket.
APPLY A DISCOUNT
In the ticket, clicking on a product allows you to apply or modify its discount. Just click on the discount, and a pop-up or overlay screen will open where you can enter the discount expressed as a percentage (e.g., 10%) or in a specific amount (e.g., 3 Euros).
This is how the product summary appears on the screen, and this is how it will look on the ticket when the sale is finished:
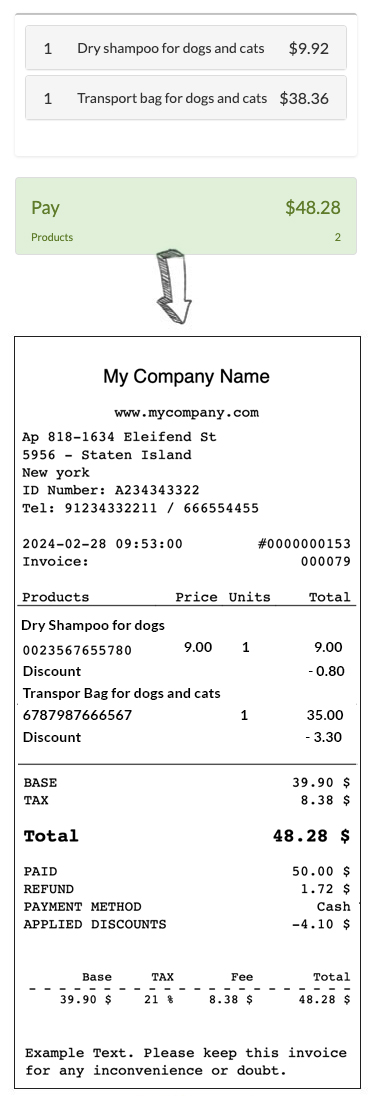
The ticket does not include information about the purchase price at which you bought the products or about your profit (the difference between the purchase and selling prices).
It only includes information related to the selling price:
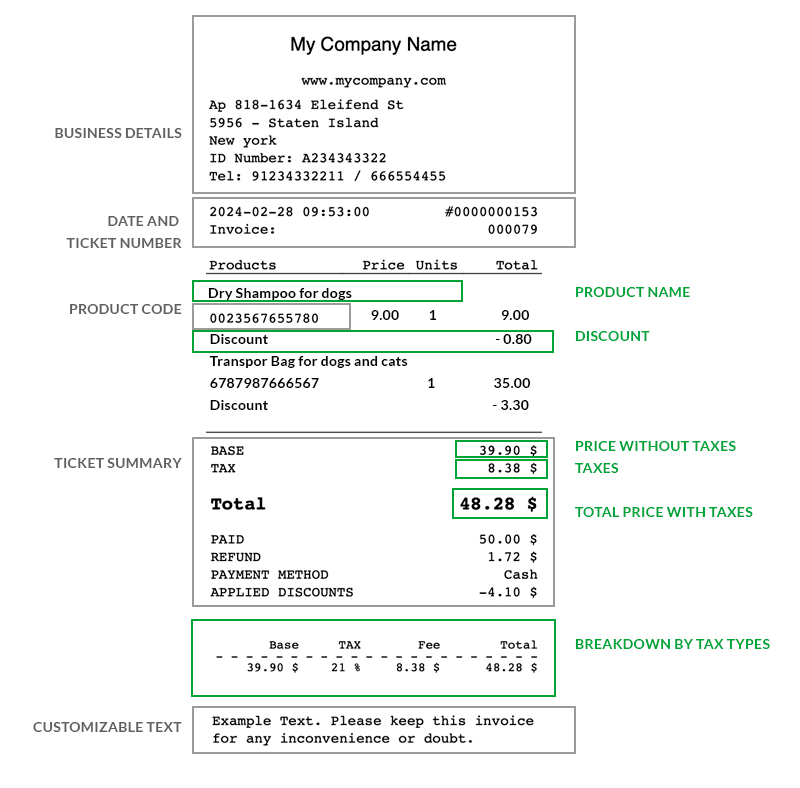
To configure your business data and the information that appears at the bottom of the ticket, go to the Configuration > Company Data option.
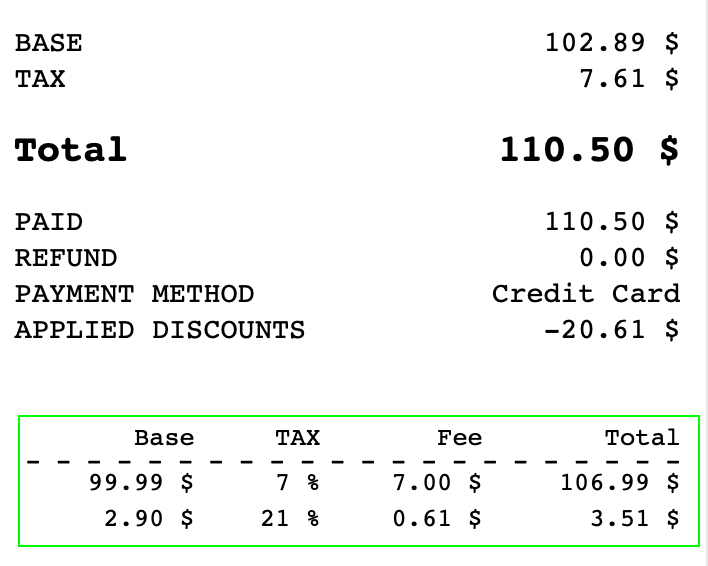
If you sell products with different tax percentages, for example, medications have 7%, food has 10%, and other products have 20%, each of the taxes will be detailed in the "ticket/receip summary" section.
The ticket/receip size is optimized for 80 mm printers. Since you can use any printer you want, the software does not have printer configuration options. This is something "external" to the software, and therefore, all ticket configuration parameters are set in the printer. Each printer has different configuration parameters, so check your printer's user guide to make the necessary adjustments for the ticket to print correctly.
The ticket you see on the screen is exactly the ticket sent to the printer for it to print. If it doesn't look the same, it's because it has a specific configuration that is altering its appearance.
If you want to include a logo or modify the color, font type, or spacing, you must do so in the printer's configuration options until it has the desired appearance.
If the letters look blurry or smaller, check the ink level and the scaling parameters or ticket scaling. For example, if the scale is set to 80%, the letters will appear 20% smaller; whereas if the scale is set to 100%, the letters will appear at 100% of their size.
If the selected font type is not monospace or monospaced, text may not be displayed correctly, jump lines, or appear cut off because the spacing between letters changes.
As you know, technical support for devices is not included in the software, so we cannot provide support for your printer's configuration.
At the top, the ticket number appears (this ticket number increments automatically).
To the right of the number is the action menu for the ticket. The available actions are:

New ticket: Clears the current ticket and creates a new empty one.
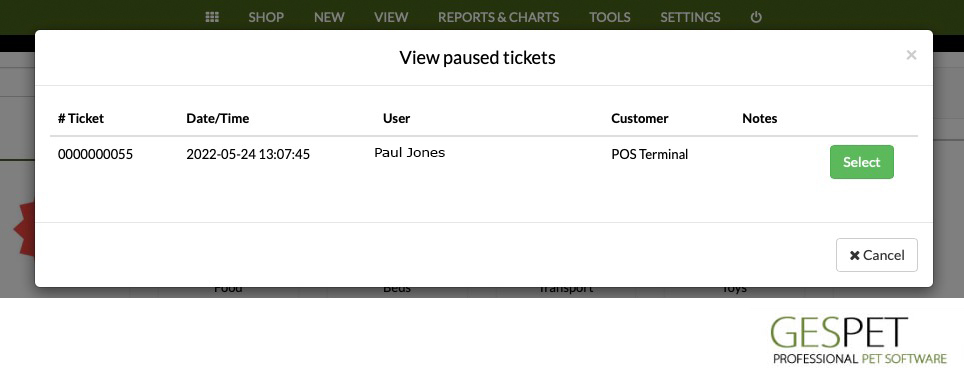
Pause ticket: Allows you to save the ticket to retrieve and complete the payment later.
Add a note to the ticket: Allows you to add a note or comment to the ticket for your information.
Delete the ticket: Deletes the ticket, and it cannot be recovered later.
View paused tickets: Allows you to view saved tickets to retrieve them later.
For example, you include a note that the customer will come back later for further shopping and pause the ticket. While creating new tickets for other customers, when the customer returns, you retrieve this ticket.
View returns/make a new return: Access to the option to make product returns.
How to make a return or refund?
Keep readingIn addition to the regular ticket, you can print the "gift ticket." This ticket does not include the product's cost.
It is usually used when you want to gift the product to someone, handing them the ticket in case they need to make an exchange, but you don't want the product's price to be visible.
You can also print the invoice, in this case, the format is not 80 mm but A4 size (210 x 297 mm).
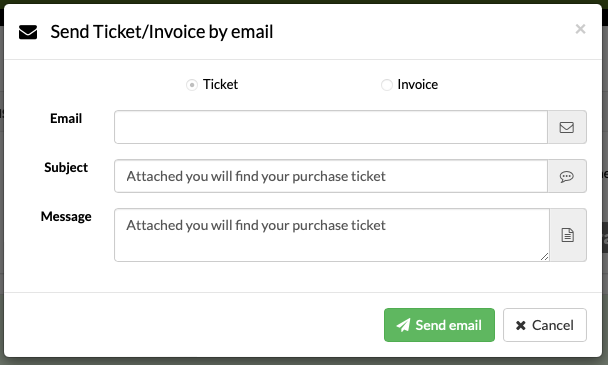
In addition to printing the ticket and invoice, you can send them by email to the customer. This is very useful as it reduces paper consumption and ink costs. Customers usually like to receive the purchase receipt in their email as it is more convenient for them.
By clicking on Send email, you can select whether to send the ticket or invoice, the email subject (the "title" part that appears when an email is sent), and the message.
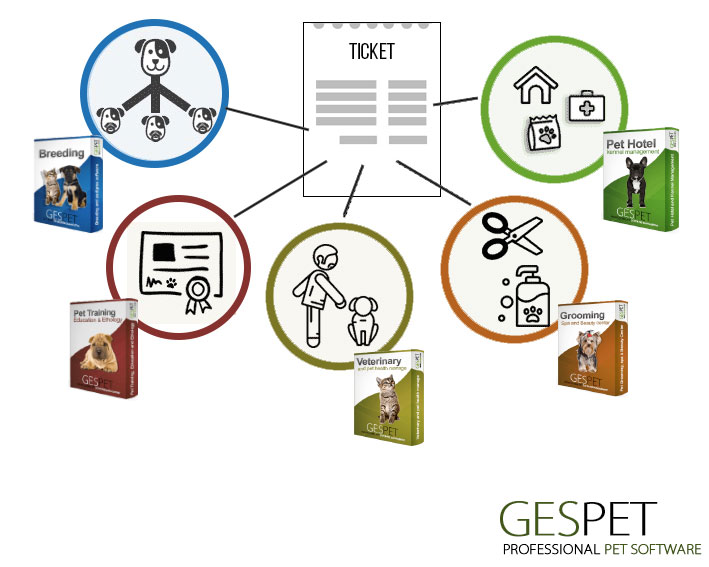
If you have other apps, you can also charge services on the same ticket for:
Hotel stay
Grooming services
Nursery/Daycare
Education/training services or sessions
Selling animals from your breeding: Puppies or breeders
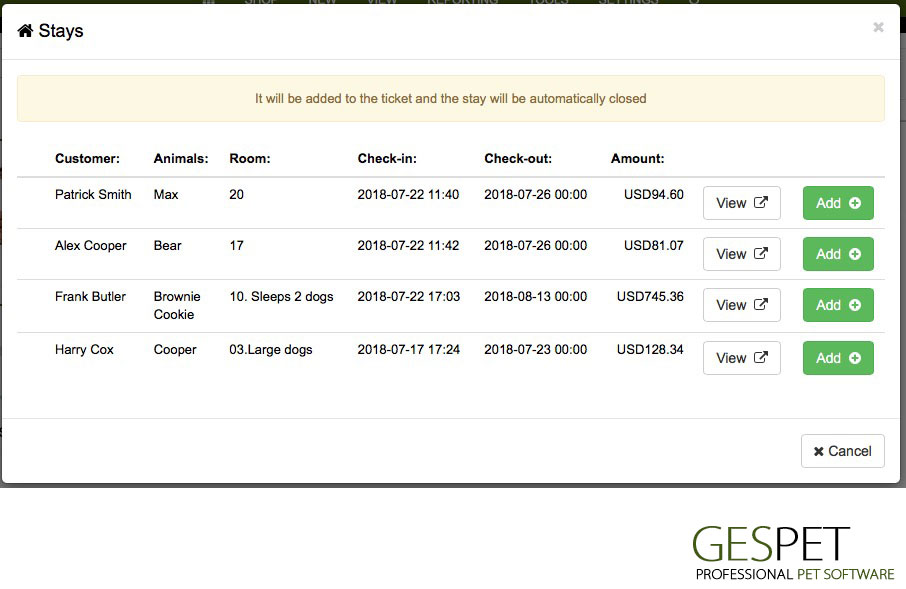
If you have pending services to charge in your other business areas, simply select the grooming/hotel/training/daycare service or the animal you want to add to the ticket to charge both the selected products and services/animals together.
Note: Remember that only pending services to charge will appear. If it is already charged, you cannot charge it again, so you cannot add it to the ticket.
For example, if the following items are added to the ticket:
STORE
Fresh dog food - $2
Dog toothbrush - $3
Retractable dog leash - $20
HAIRDRESSING
Bath + haircut - $30
TRAINING
Behavior correction session - $18
The total of the ticket is $73, but the products/services are "accounted for" in their respective areas:
$25 in PetShop products
$30 in Grooming services
$18 in Pet Training services
The total appears on the ticket, but on the invoice, it will be separated. You will have an invoice for the sale of store products ($25), another for grooming services ($30), and another for training services ($18).
The popup that opens to view/print the invoice will have 3 pages, each with the corresponding invoice for store, grooming, and training sales.
We understand that detailed management of income and expenses is a fundamental part of your business, and with this system, you can check the money you have earned from each of your business areas.
If you want to know the total turnover, for example, for the last month, you can see how much you have earned with all your business areas. But if you prefer, you can also check how much you have earned exclusively from your grooming services, for example.
Note: Remember that the Cash option is exclusively available for the PetShop, so only store product sales will logically appear in the cash.
But if you want to see the sales from all business areas for today, you have the option Reports > Invoicing > Where you can see ALL sales by selecting all the Apps and the date you want to check (for example, sales for today or the last 7 days, ....)
Note: when you add a service (e.g., grooming) to the store ticket and charge it, in its corresponding app, the service is "closed," meaning it is recorded as paid or invoiced.