
Let's see how to buy and sell products quickly using the software. The correct order is:
Create the categories and subcategories you want for those products you are going to add
Import or add these products individually
If you want, you can register the orders and purchases of products
Sell products to customers
On the one hand, there is the price at which you buy the product and on the other the price at which you sell it. We are going to explain how to configure them correctly.
The purchase price, you write it when you register the new purchase. It's possible that you buy it at different prices throughout the months or years that you sell that product, so you will be able to see a history with all the purchases you have made of that product, a graph, the average purchase price, the supplier and at what price you bought it each time.
The sale priceis included in the product file. Also make offers on a product. If you sell it at different prices during the months/years, you will see a history with all the sale prices of that product, a graph and the average sale price, to see the evolution.
Also, as you know, products may include taxes. The base price is the price without taxes and the final price or sale price is the price with taxes already included). In the software, if you write one of the prices, the software will automatically calculate the other price.
The purchase price is not set here as it is a changing value. You will not
always buy the product at the same price and you may not always buy it from
the same supplier.
You will need to know from which suppliers and at what prices you have
bought it, and have a record to be able to evaluate which supplier offers
you the best prices. The purchase of products is noted in the option New >
Purchase.
The tab will show the last price at which you bought it and therefore the profit (sale price - purchase price).
If you want to see in detail how to add purchases, products and make sales, keep reading:
If you want to see how to add purchases, products and make sales, keep reading:
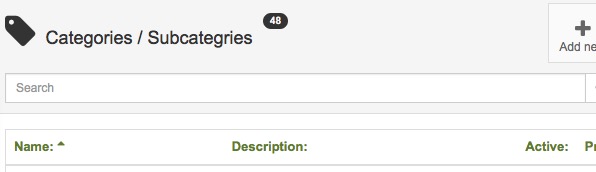
The categories allow to organize the products. You can create as many categories and subcategories as you need. If you order the products well, it will be much easier to work with them.
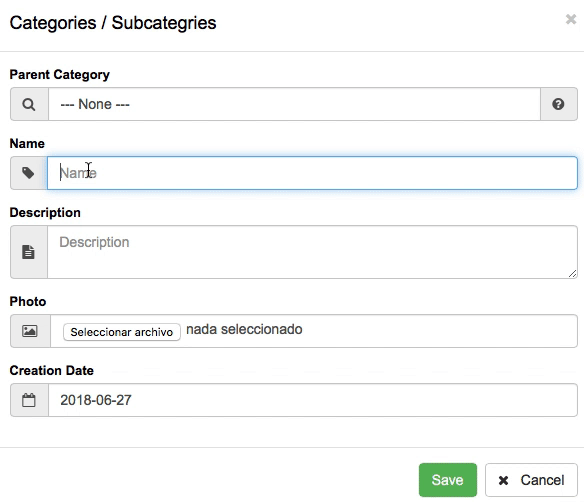
Click on the option New > Category/Subcategory or View > Categories/Subcategories
Note: Before adding a new category, check if it is already added in your database.
You can use the search engine at the top and you can also sort alphabetically ascending or descending by clicking on the name or the description
You can create main categories or "Parent categories" and secondary or subcategories. Here's how to do it, it's very simple:
For example, to organize your products you want to do it in this way:
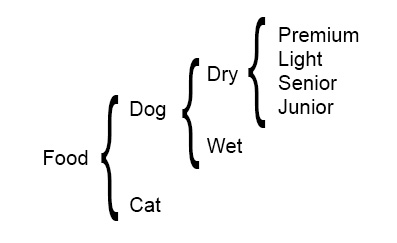
1º We create the first category of our example: FOOD
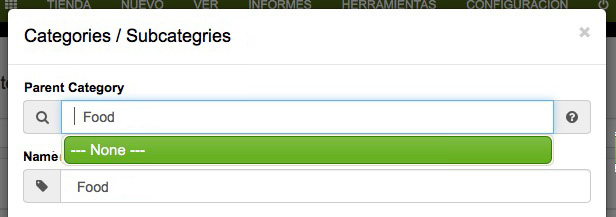
In the Parent-category search engine, type "Food"
As there is no such category, click on -NONE-

Now in the search engine it appears written Parent-Category: NONE
Write the name you want to give to that category, in our example: FOOD
If you want, add a description and a photo for that category.
Click on Save
NOTE: It is recommended that you add a photo, because it will help you later to visualize in a faster way the categories in the screen of sales ( New > Sale )
2º We create the second category of our example: DOGS
Search the parent-category FOOD, appears (highlighted in green), select it by clicking on it
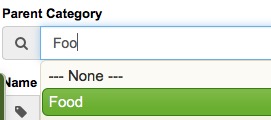
Write the name of the second category, in our example is DOGSS
Add the description and the photo and click on Save
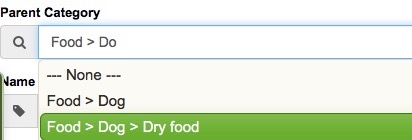
3º We repeat the same process for the third category: DRY FOOD
Look for the parent-category, in this case " Food> Dogs ", appears (highlighted in green), select by clicking on it.
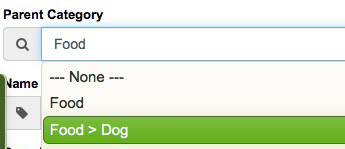
Note: As you can see, it is very easy, just by writing the first letters, the different results appear
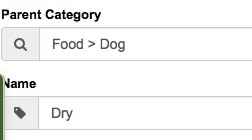
Write the name of the new category "Dry Food", if you want a description and a photo and click on Save
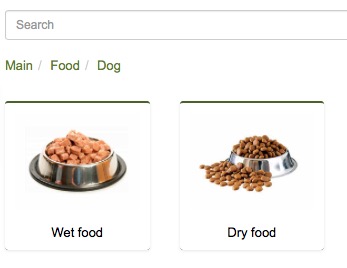
4º We repeat the same process to add the fourth category: Wet food
Search the parenet-category, in this case the same as in the previous case "Food > Dogs", appears (highlighted in green), select by clicking on it.
Write the name of the new category "Wet Food", if you want a description and a photo and click on Save
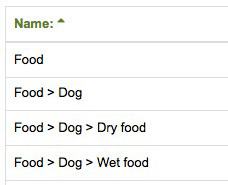
You have created the categories:
NOTE: As we have commented previously, it is recommended that you add a photo, because it will help you later to visualize in a faster way the categories in the screen of sales ( New > Sale )
View of the categories that we just added
You can import all your products or add them individually from the New > Product option. Import or insert the data and press Save.
To make the addition faster, the product is noted and the form remains empty so you can add a new product.
How to add new productsHere add the basic options and then from the option View> Products> select the product> you can add much more information: photo, stock, important information, notes, .....
Important: Before adding a new product, perform a search to see if it is already entered in your database
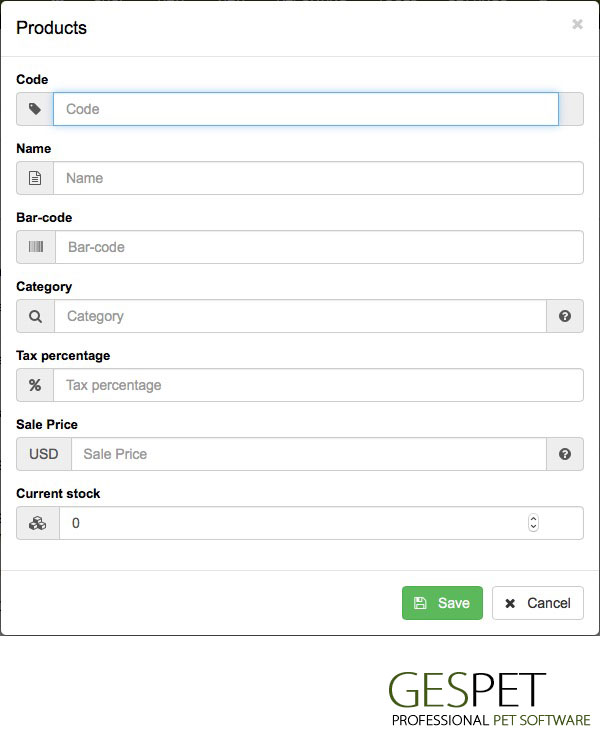
Code: Write here the code that you want to assign to that product. You can simply put a number or use different types of codes, is easiest for you to identify your products (bathroom01, CM0002, ...)
Name:Write here the name of the product. Then you can add a description, in case you want to add additional information.
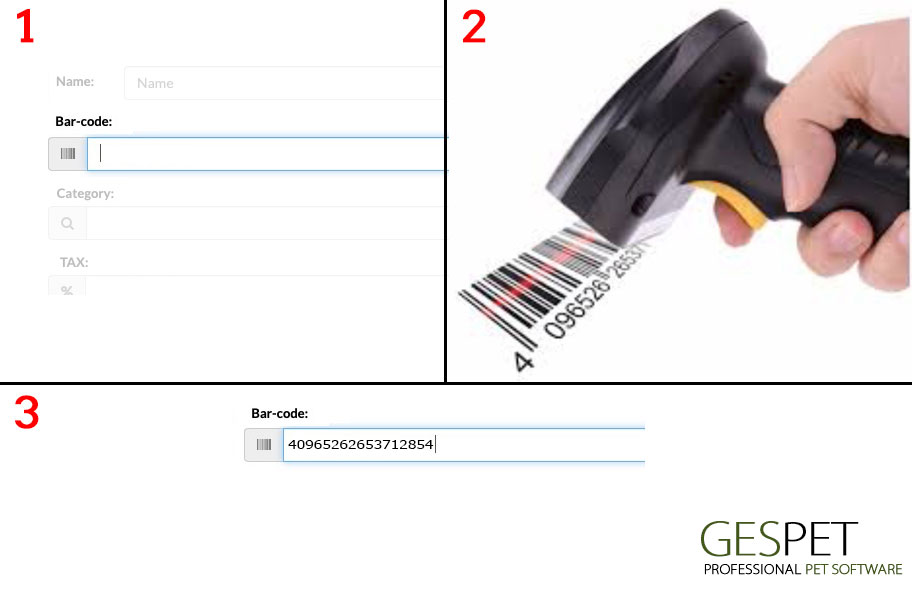
Barcode: you can manually write the code or use a scanner or barcode reader.
It is very easy to use the scanner. It is not necessary to make any additional configuration.
Put the mouse cursor or click on the field where you want to insert the code (the search engine, or the barcode field when adding a new product)
The field is enabled
Write de number or scan the product barcode with the scanner (or barcode reader)
Tax percentage: The % of the tax to be applied.
For example in Spain (Peninsula) the tax applicable is IVA and is different depending on the type of product.
For example for a bed, the tax is 21% IVA, so in that field, we would write: 21
Sale price: Base price, that is, without taxes. Later on the ticket the base price, the tax and the final or total price will be broken down.
You can enter a new purchase:
If you have previously placed an order
If you have not placed an order
When you make a new purchase from a supplier, you can add it to the system so that the Stock (available product units) is automatically adjusted. Also you can control the batches and expiration dates. Purchases are added in the New > Purchase option.
PART 1: THE SUPPLIER
Find the provider or add it directly. You will see his information:
Contact information
If you have bills pending payment to that provider
If you have pending orders to receive from that provider
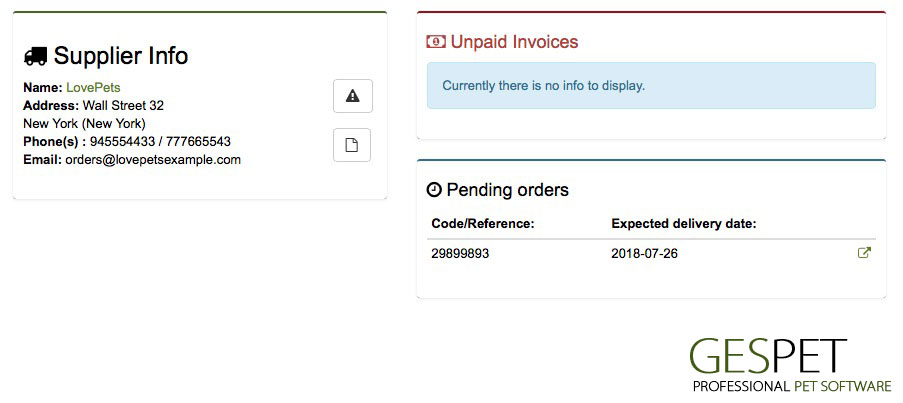
notes:
Supplier information area: If you click on the name of the provider, you can directly access to the home page or magic desj of this supplier
Unpaid invoices area: if you click on the pending invoice, you will see it in detail
Pending orders area: if you click on the arrow icon, you will see the order in detail
PART 2: THE PURCHASE
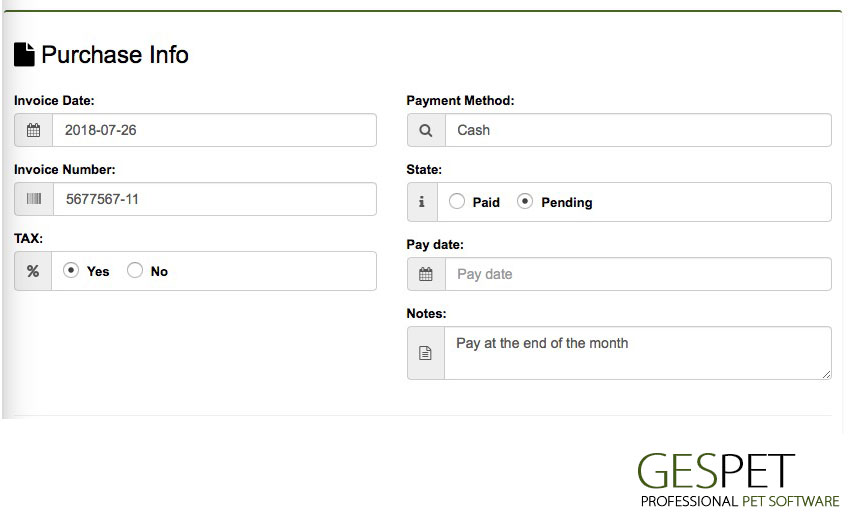
The date and invoice number appears
If it include or not tax (the tax you have configured on your settings parameter)
Select the payment method and status (paid or pending)
If paid, you can include the payment date and if it is not yet, leave it empty *
You can include notes or comments for your information
* This you can change later. If the invoice is now pending payment, it will not have an invoice date. The day you pay the invoice, access the option View > Purchases > select that invoice and:
Change the status to "paid"
Indicate the date of payment
Automatically is added the purchase in the "Cash" and you will see that if today you have made the payment, today the money has been withdrawn from that purchase (even if the purchase was made 1 month ago for example)
PART 3: THE PRODUCTS
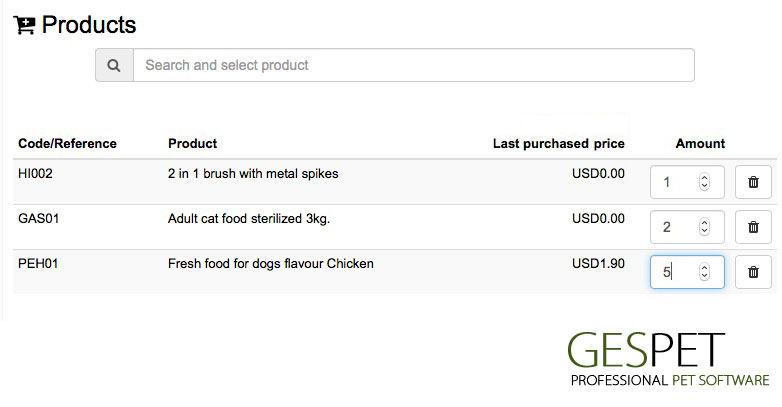
Select the products and they are added to the purchase
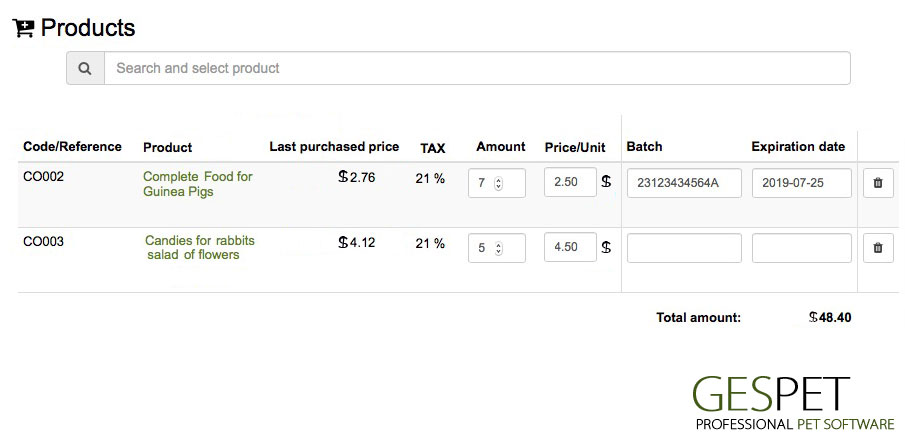
Apperas the product's code or reference , the name and the last price at which you bought
note: By clicking on the name, is displayed the "product's magic desk" so you can see all the information about that product
Now it indicates:
The number of units of that product that you buy
The purchase price (for example $ 10 each)
If it is a perishable product, we recommend that you also include the batch information and expiration date, in this way, the software will automatically notify you when a batch of products is about to expire
To delete that product from the purchase, click on the button trash
Click on the Save button to write down the purchase and the software automatically:
You will add those products to your stock (for example +4 balls or +2 houses
It will change the "last purchase price" of that product, and
now it will be the new one that you just entered
note: in the magic desk or product card (See>
products) you can see a history with all the prices you
have bought that product and the detail, in this way, you
can see the suppliers that offer you better prices or
variations of prices that a product has suffered.
It will show on the home page, a warning when that lot is about to expire
If the invoice is paid, you will enter the cost in the Cash on the date you have selected as payment date (for example, today - 30$ for the purchase of these products.
In the option View > purchases, you can see all the purchases that you have added and change the status when the payment of the purchases that you have "pending payment" is made.
You can add orders for the products you need and send this order form to your suppliers by email.
So you can see that the "product x" you do not have units in stock but you have already made an order to the supplier and what day is expected to receive it.
PART 1: THE SUPPLIER
Find the provider or add it directly. You will see his information:
Contact information
If you have bills pending payment to that provider
If you have pending orders to receive from that provider
notes:
Supplier information area: If you click on the name of the provider, you can directly access to the home page or magic desj of this supplier
Unpaid invoices area: if you click on the pending invoice, you will see it in detail
Pending orders area: if you click on the arrow icon, you will see the order in detail
PART 2: THE ORDER
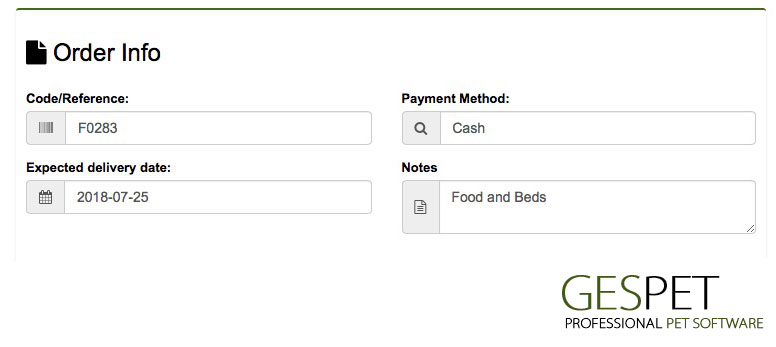
You can write a code or reference for yourself, that is, so that you can identify the order
The payment method
The expected date for delivery. On the home page of the software, will warn you that day
Notes or comments for you
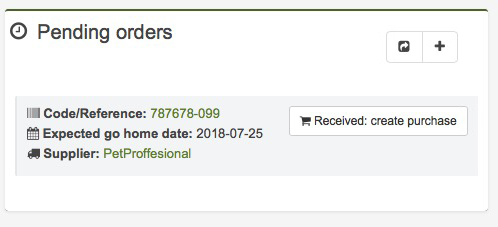
On the home page you will see the notice that today you are expected to receive these orders and you can write them directly as soon as you receive them to include the products in your inventory or stock:
PART 3: THE PRODUCTS
Search in the product search and all matches will appear
Press to add it
You can change the number of units
You can delete it by clicking on the trash can or trash can icon
The last price at which you bought that product appears
When you have finished adding all the products, click on the save button to write down the order
You will see the orders you have made, the expected delivery date and
your status.
Then, when you receive the order, from the home page or from the option
View > Orders, you can convert that order into a purchase and the
products will be included in your stock.

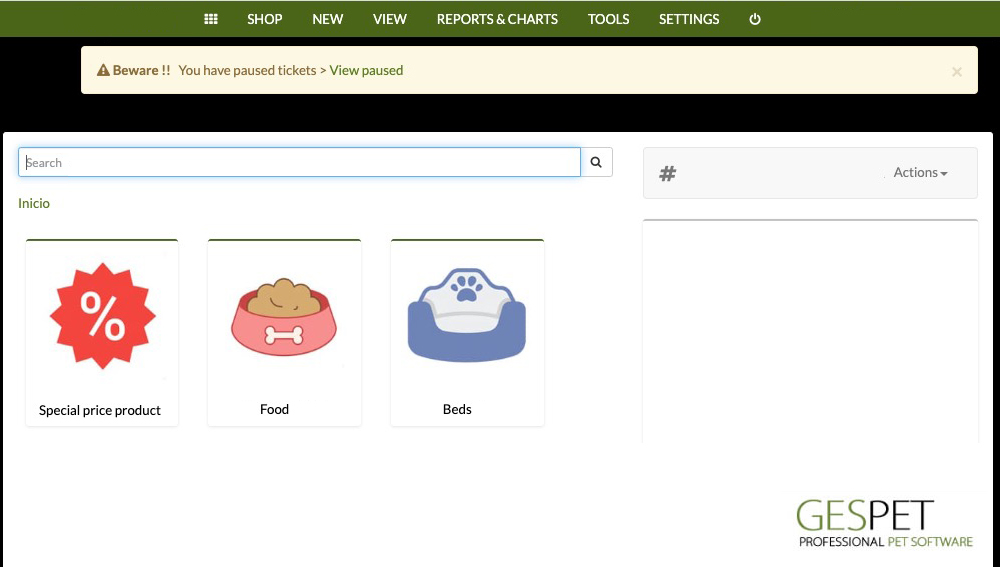
In the New > Sale option, you will find the POS or sales screen, where you can make sales very quickly.
How to sell using the software?If the Cash is open, you can make a new sale
The screen is divided into two areas:
Right: Ticket area and sales options
Left: Products area
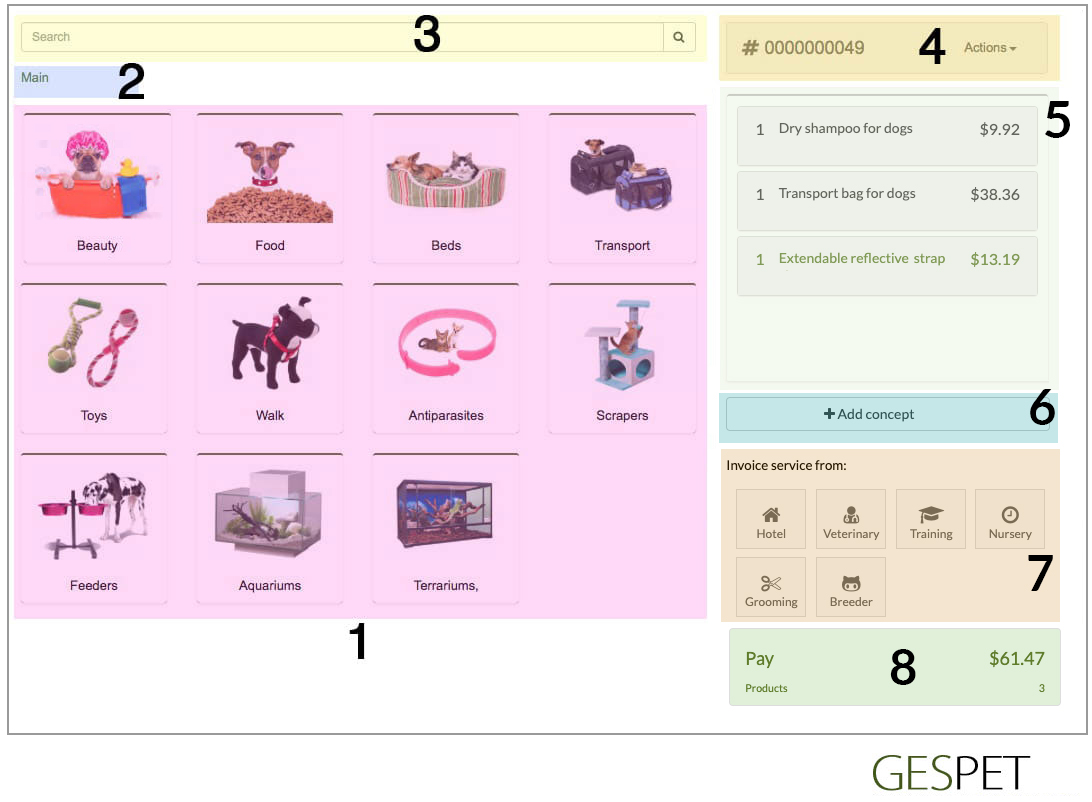
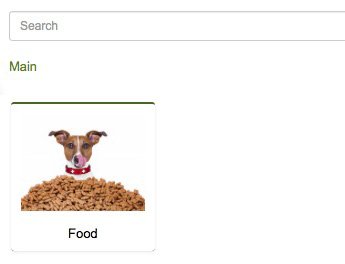
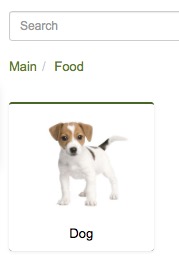
Listing with all categories / subcategories of products. Clicking on a category, its subcategories appear if you have them and the products included in that category / subcategory
PRODUCTS WITH SPECIAL PRICE: Ee have included a direct link to all the products with discount or special price.
So you will be able to see all the products with a special price, and you dont need to navigate between the different categories to search for them.
HOW TO ADD PRODUCTS TO THE TICKET
If you click on a product, a unit of that product is added to the ticket. If you press again, another unit is added and so on (5 times = 5 units added to the ticket)
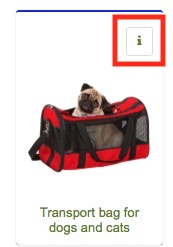
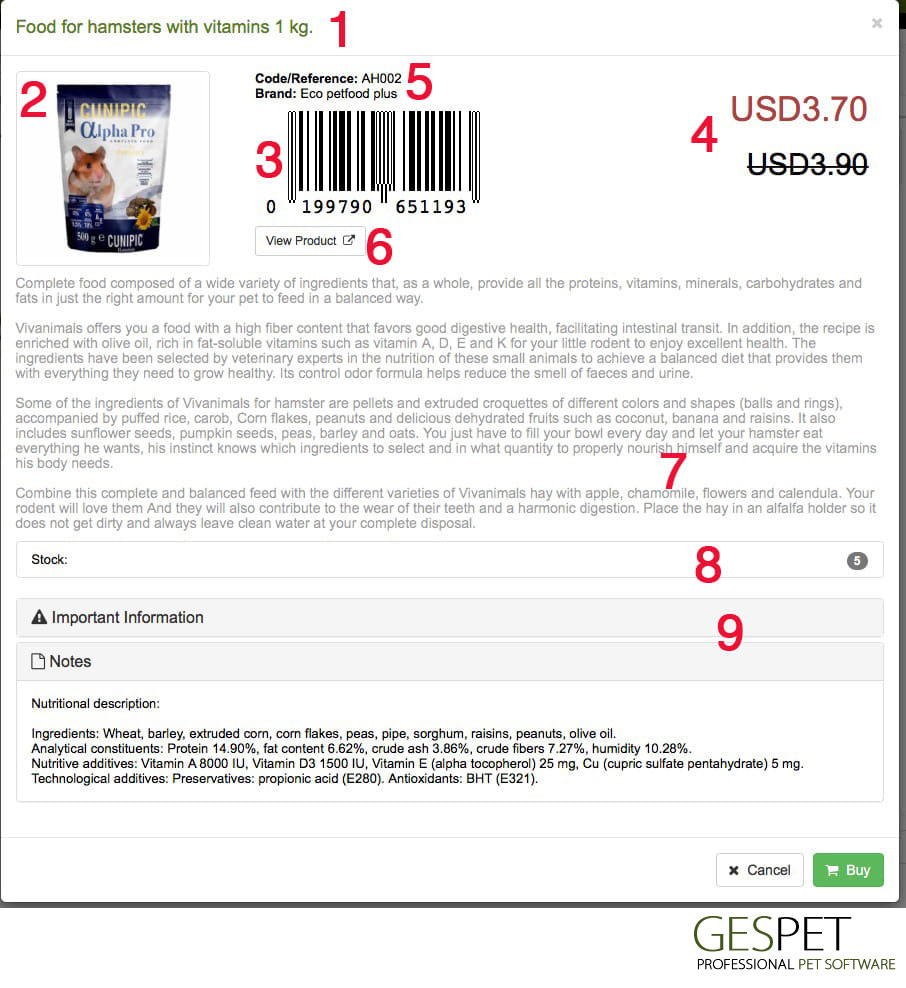
The products have a button with an "i" icon to see more information. If you click on it, you can see all the information of that product:
The name: By clicking, open the product file in a new tab
The photo
The barcode
The current price and if it is a product on offer also appears the regular price strikethrough
The code / reference and the brand
A quick access button to the product file
The description
The number of units availables or units "in stock": For example we have 19 units of this product
Important information and notes: When clicking on them, this information appears
Navbar. Show the different categories / subcategories, so you know exactly where you are, for example: in the category Food > subcategory Dog > subcategory Wet food:

Clicking on the name of the category, you return to that category
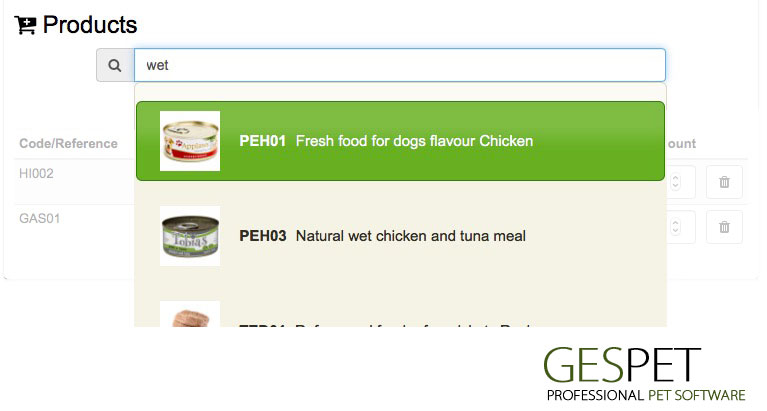
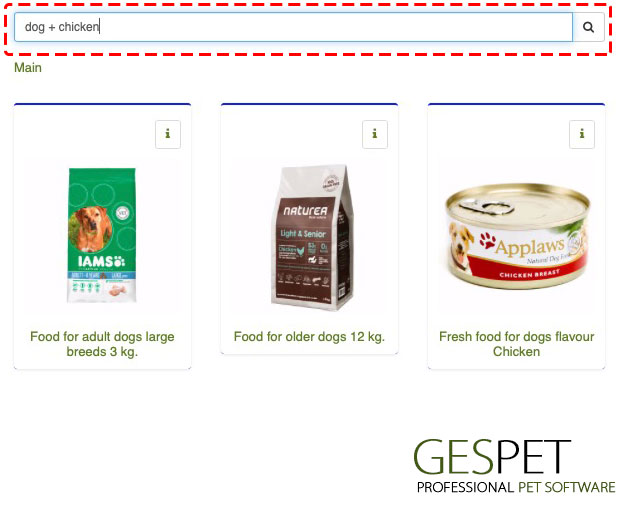
Search engine.If you do not want to navigate between categories, you can search for the product using the search engine
You can scan the code of that product using your barcode reader
Or you can write the name of the product, the brand, etc .:
As you already know, search engines autocomplete automatically, so just by typing "fee" .. you'll see that it shows all the results that include those letters, like for example "feeder".
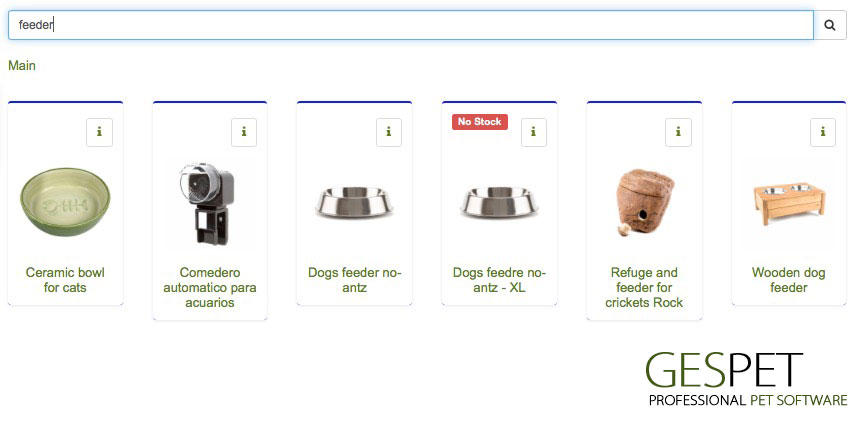
Also you can do combined searches, for example: food + chicken
Ticket number and more actions : The ticket number automatically auto-increments.

The available actions are:
New ticket: Delete the current ticket and create a new vticket acio.
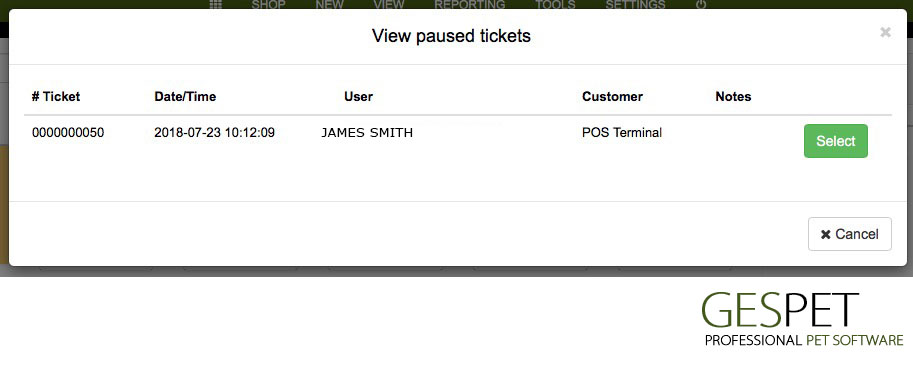
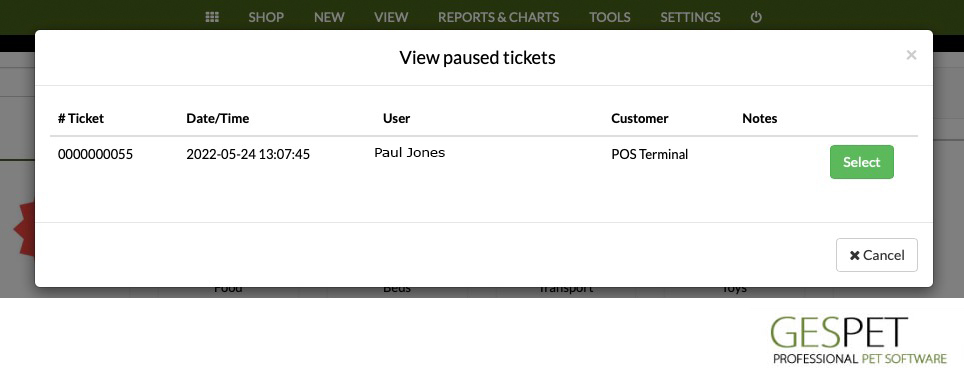
Pause the ticket: Save the ticket to retrieve it and then
Add a note to the ticket: Allows you to add a note or comment to the ticket.
Delete the ticket: Delete the ticket, it can not be recovered after
View the paused tickets: Allow to see the tickets that you have saved to recover them after
For example, we include a note that the customer will come later to continue buying and pause the ticket. While we make new tickets for other clients and when the client returns, we retrieve this ticket.
See returns / make a new return: Access to the option to return products
¿How to make a refund?Products / services added to the ticket . [AREA 1] When clicking on a product, a unit of that product is added to the ticket. If you press more times, more units of the same product are added.
To change the number of units or eliminate it, click on the product of the ticket and more information appears below:
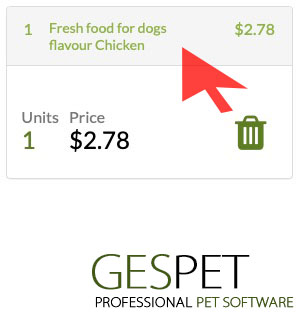
By clicking on Units you can change and put for example 3. And when you click on the trash can icon, they are removed from the ticket.
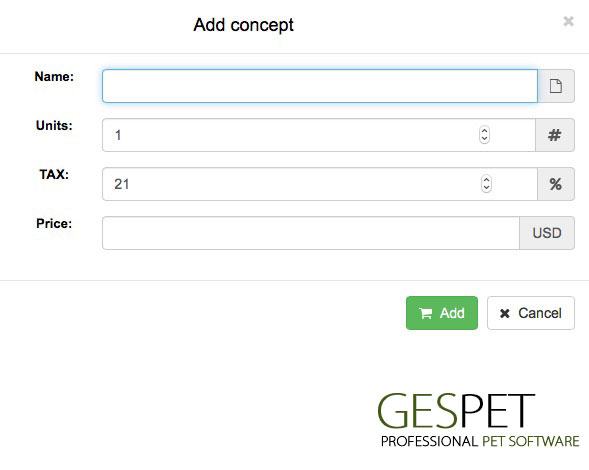
Add concepts . You can add concepts or products "manually" because for example they are not included in your database.
Add services to the ticket from other areas of your business . If you have other apps, you can charge products and services on the same ticket:
Hotel services
Grooming services
Nursery or day-care services
Education services / training sessions
Sale of animals from your kennel: Puppies or Breeders
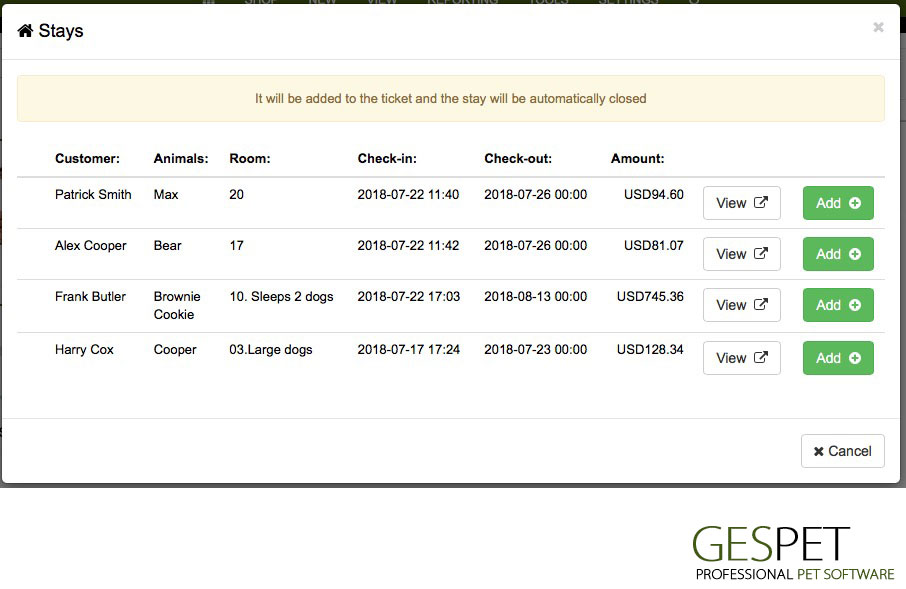
If you have pending payment servicesin your other business areas, simply select the grooming / hotel / training / nursery service or the animal you wish to add to the ticket to collect together the products and services/animals selected.
note: remember, only the services pending to be collected appear, if it is already charged, you can not charge it again, therefore you can not add it to the ticket.
For example, if in the ticket we have added the following concepts:
PET SHOP
Fresh food for dogs - $2
Toothbrush for dogs - $3
Extendable strap for dogs - $20
GROOMING
Bath & haircut - $30
TRAINING
Conduct correction session - $18
The total ticket is $ 73, but the products/services are "account" in their corresponding area:
$25 in PetShop products
$30 in Pet grooming services
$18 in Training Services
The total appears on the ticket, but on the bill appears separately. You will have an invoice with the sales of petshop (25$), another with the grooming services (30$) and another with the training services (18$).
(The pop-up that opens to view/print the invoice will have 3 pages and in each of them, there is the corresponding invoice: pet grooming, petshop & training.)
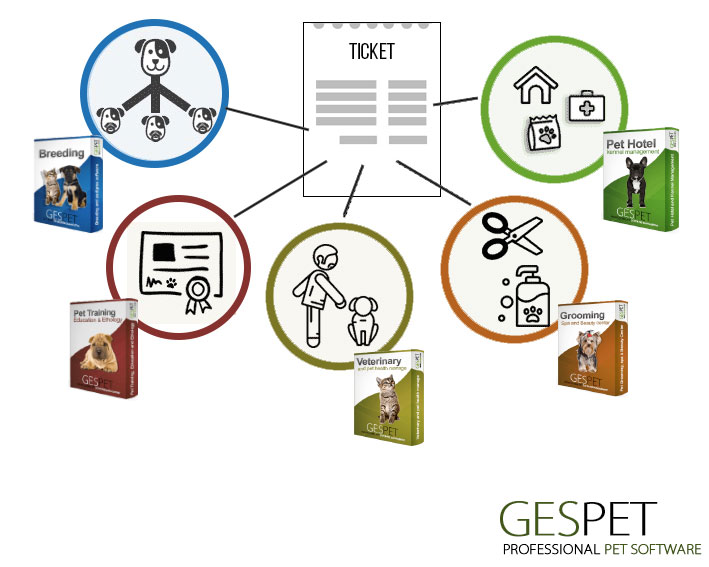
We know that the detailed management of income and expenses is a fundamental part of your business, and therefore, with this system, you can check the money you have earned with each of your business areas.
If you want to know what the total billing has been, for example in the last month, you will be able to see how much you have earned with all your business areas; But if you prefer, you can also check how much you have won exclusively with your grooming services.
Note: Remember, that the Cash option is an option available exclusively for the PetShop, therefore, only petshop sales will logically appear in cash.
But if you want to see the sales of all the business areas for today, you have the option Reports > Billing > Where you can see ALL the sales selecting all the Apps and the date you want to consult (for example sales) today, or the last 7 days, ....)
Note: when you add a service (for example Grooming) to the PetShop ticket and you charge it, in its corresponding app, the service "closes", that is, it is already recorded as charged or billed.
AUTO-SAVING FOR TICKETS
As we have seen before, you can manually save or pause tickets whenever you want. But in addition, the software includes an automatic auto-save system. you are doing a sale, but you leave that screen or even you accidentally close the software without saving or pausing the ticket. Thank to auto-saving, that ticket is never lost; it has been automatically saved or paused so you can retrieve it to continue working on it later.
When you access to the menu option New > Sale again, a warn message will appear to remind you that you have paused tickets, in case you want to recover them. If you want, just select the corresponding ticket and you will recover the ticket to continue doing the sale.
Finish and Pay
When clicking on the "Pay" button, the screen to complete the payment appears.
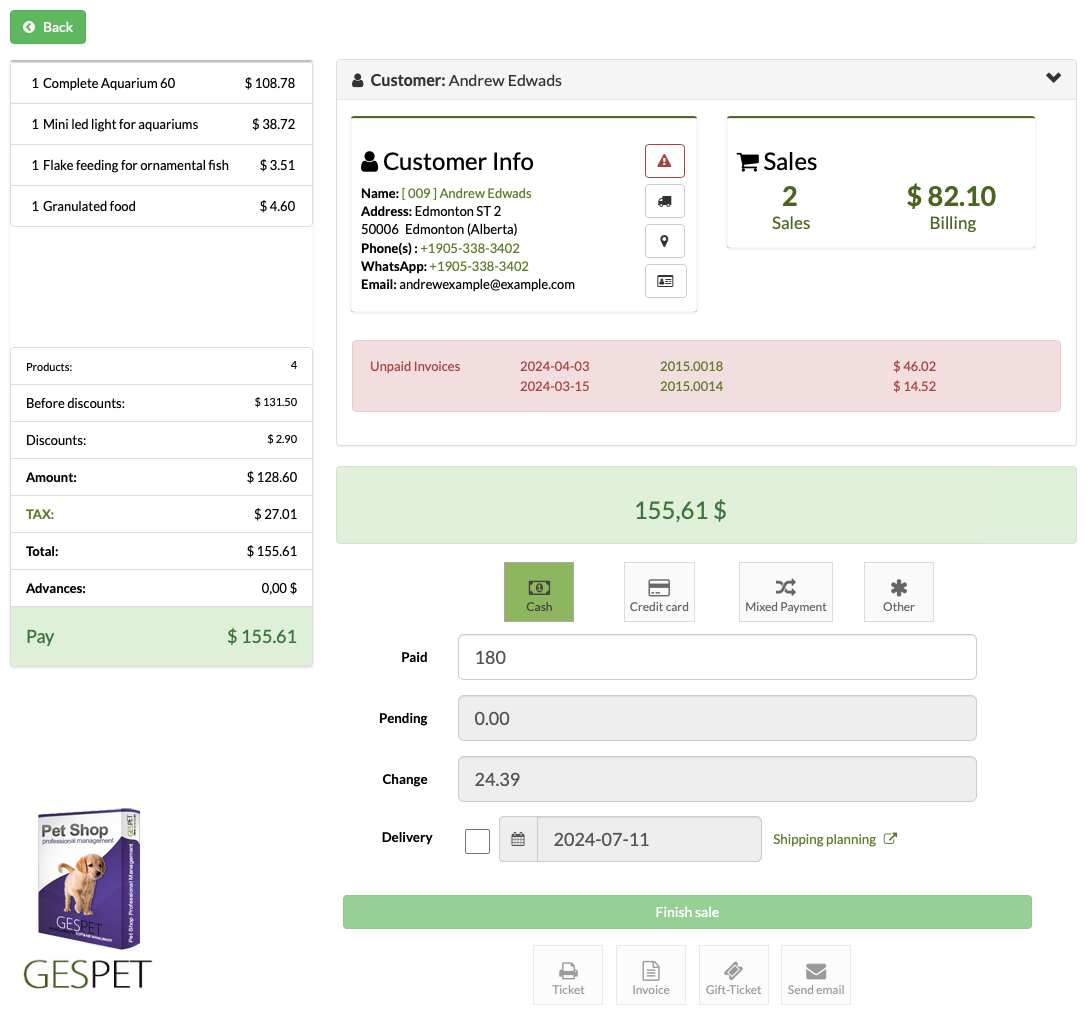
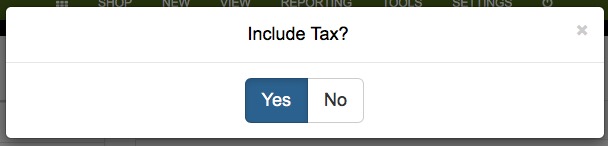
1. Summary of the ticket: All the products and services of the ticket appear and the details of discounts, taxes, etc.
If you click on the name of the tax, you can select if you want the ticket to include taxes or not.
2. Customer: By default ,the generic customer or "POS terminal" is selected.
If you want to select a customer from your database or add it, you can do it just by looking for its name or clicking on the "New customer" button.
If the customer already exists , when you start typing your name, all the customers with that name and its details appear:
The contact information
The important information
The pickup/delivery information
The number of sales
The money "spent" in the business
If he have unpaid bills
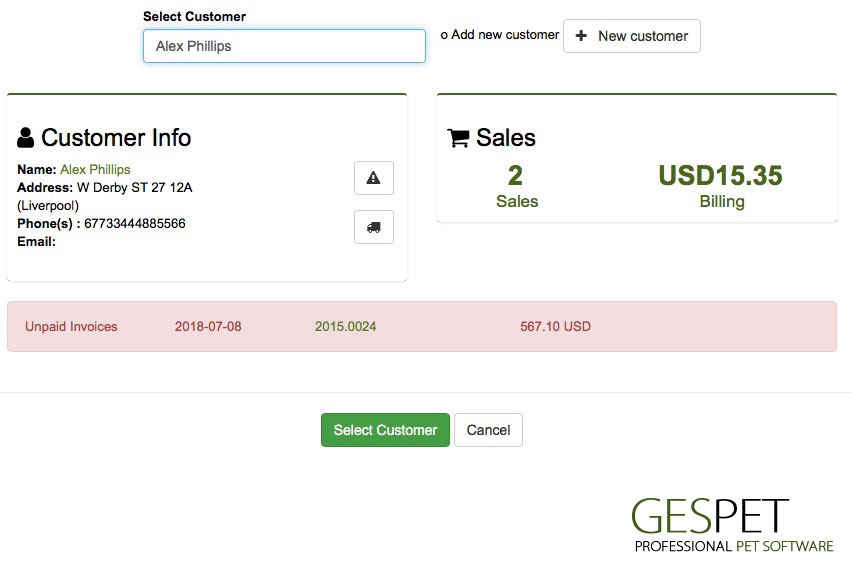
If that is the customer you want to select, click on "select customer". It will appear as a customer of that ticket and if he wants an invoice, his data will already appear automatically filled.
If that is not the customer you are looking for, type the name again in the search engine so that other results appear and choose the correct one.
If the customer is new (it does not exist in your database), click on the "new customer" button to add it

3. Amount to pay
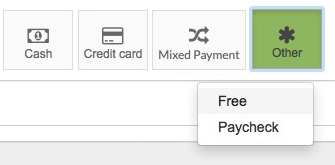
4. Payment method and amount paid . Select Cash, card or "Other" to show the rest of the payment methods that you have configured in your system (in the option Settings > payment methods)
When writing the amount that the customer gives you, the amount pending payment or the amount left over (money to be returned) is automatically calculated.
It is possible to sell "on credit", ie collect only a part of the money and leave part of the money "pending payment" . For example, for a € 150 sale, we only charge 30 and leave the remaining € 120 pending collection.
The sale will have a "Pending" status (for payment), only the money that we have actually collected will be recorded in the Cash option (in the example of € 30). In the option View > sales, you will see that sale with the money that has already been paid and the one that is pending.
When the client pays the rest, it is only necessary to access the option View > sales > select that sale and change the status to "paid" and indicate the date of payment.
You have a specific report to quickly see the invoices or sales that are pending payment. It is the report of "unpaid bills" where the total money appears, the one that you have already been paid and the pending amount
5. Print ticket, print gift-ticket (price not visible) , print invoice or send by email to the customer